Donnerstag, 29. März 2012

Control a LEGO NXT brick from a smartphone using AppInventor

Dear lovers of embedded electronics!

Today, as I was on duty for tech support, I had lots of time to try something new. Being equipped with a Samsung Galaxy S i9001 smartphone, I told myself that it must be possible to connect the thing to a LEGO Mindstorms NXT programmable brick via a Bluetooth Serial Port Profile (SPP) connection. As I'm not really deep into Android programming yet, I wanted to use MIT's AppInventor (download local component for Windows here) to create a control application for the phone. I intended to let my app read the orientation sensor's values and use them to set the output power for some motors accordingly.
First, I paired the NXT with my phone using the Bluetooth system settings panel. This step is neccessary, as pairing new devices is impossible from inside an app. The NXT got two motors connected to ports B and C.
Second, I created my app's screen in the AppInventor. To control the NXT, I had to add a BluetoothClient and an NxtDrive. The NxtDrive uses the BluetoothClient to communicate with the NXT, so the NxtDrive must be told which instance of BluetoothClient to use within the screen designer! Then there's the OrientationSensor the measure how your phone is tilted at the moment.
I also added three labels to display the orientation values and a list picker. The list picker is used to connect to a specfic Bluetooth device via SPP. As I said, the device must be paired outside the app. The SPP connection itself is created from within the app.
So here's a screenshot of my very simple screen layout:
NXT control screen layout
NxtDrive property rollout: Note that the value of "BluetoothClient" is set to "BluetoothClient1"
Now it's time to switch to the Blocks Editor. Let's configure the list picker first. When I press it, it should show me a list of all paired devices, from which I can pick my NXT to connect to. Here's the program:
Somehow it's neccessary to save the result of the call to BluetoothClient1.Connect in a variable, so that's what I did here, but I don't use the result anywhere.
Finally, the orientation values have to be read continuously and the motor power has to be set accordingly. I just use the "roll" readings and adjust for signedness, as I don't know whether MoveForwardIndefinitely can take any negative values for its power setting. So, if the "roll" value is negative, I tell the NXT motors to rotate backward, otherwise, they'll have to move forward (whatever that means...). I also update the labels to show the orientation values.
Here's what it looks like:
Last, but not least, here's a video showing you how to operate the app:

Montag, 27. Februar 2012

LFT Tracker Howto

Hi folks!

This time I'm back fulfilling a request by therobomaker957 on how to use lft's chiptune tracker to compose a chiptune and run the tune on an Arduino.
Well, at first, you should grab every piece of code and script from my earlier post. Then, you have to compile the tracker. Assuming you run Ubuntu oder Debian, you'll need build-essential and libsdl for this. Currently, I see no way to rund the tracker in Windows. Perhaps it'll work with cygwin, but it certainly doesn't work with a VirtualBox image of Ubuntu. I tried that before and got no sound out of it.
But before you run the tracker, I think it's time for some overview of creating music using with this concept from the early days of computer music. As the name hints at, you arrange your tune by placing key-ons and key-offs (a bit like MIDI) into several tracks. Within lft's environment, you can have four tracks in parallel, meaning you can play up to four different instruments at the same time - or the same instrument four times, e.g. to play a chord.
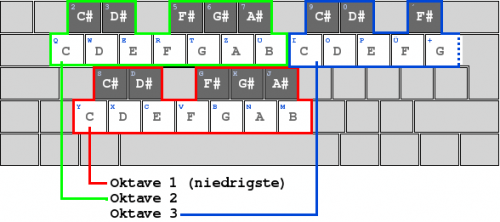
You can put your key-ons (key strokes) into a column of 32 rows, making one track. So if you wanted to play a beat at quarter notes for example, you'd put a note at every fourth line, leaving the rest blank (---). You can use the keyboard to enter different pitches like this (switch octaves with < and >):


This is actually the same as in FastTracker II oder MadTracker, if you've ever worked with these before.
Now, when you run the tracker (don't forget to specify a song file!), you'll see something like this:

On the right, there's the instrument editor (for an explanation of the various commands and key bindings, see lft's tracker readme file in the source zip). In the middle, you can edit the current track (0-128). On the left, you can arrange the different tracks you created into a song. Just enter the number of a track in every of the four different song columns and that track will be played there.
When you're done with editing, save your song - and then export it. The export will create an assembly source file. It contains two song configuration values (length and maxtrack) and a static array of values. However, this array is NOT the one you can paste into the chiptune Arduino sketch. As I couldn't find out how the array in the assembly file and the one in the Arduino sketch were related, I simply had the source file compiled into an object file. Then I dumped the contents of the object file and there it was - the data I needed to paste into the sketch. In the end I wrote a small script (which also uses a simple Java parser) to automate this job of compiling and dumping the assembly stuff.
If you run my script on an exported song (.s file), you should be able to get another file containing the data you can paste into your sketch. All that's left to to then is to adjust the values of MAXTRACK and SONGLEN according to the exported song and you should be the proud owner of your own chiptune playing on your favourite bit of hardware.

Hope this helps (works, even!).

Montag, 20. Februar 2012

IPM V2 approaches completion

Hey guys!

Well, it's been some time since my last post, but sometimes there's just so much work to do, you'd need a week to finish one day's load.
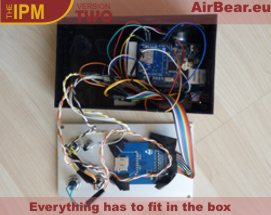
Anyway, during a week off at my best man's home (he is called "The AirBear"), we nearly managed to finish the second version of the Internet Personal Messenger. The IPM v2 has a new page all for itself, showing off some stages of its hardware development.


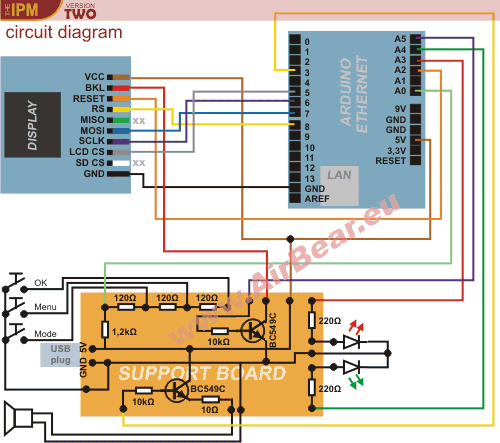
The TFT's backlight is very hungry for power, which presented us with some problems, because the wiring on the Arduino board was incapable of distributing the power from the USB port well enough to fit the whole appliance. To solve this issue, we built a "support board" which also holds all the external circuitry, like speaker amplifier, button resistor ladder, etc. The AirBear built the board from the meagre information he could deduce from my instructions, which were somewhat confusing, because I didn't ever think of documenting the wiring before ;) It drove him close to madness when I told him I needed another connection to VCC for the TFT backlight - there wasn't any space left on the small PCB! Well, a Y-cable did the trick in the end :P You can see the complete schematic here:


We also had an argument about the buttons: When almost completely finished, The AirBear had to take the whole thing apart again because the buttons seemed to be in the wrong order. When we had carefully reassembled the IPM, the buttons were STILL in the wrong order! At home, a close inspection of the daughter board yielded a solder bridge between two copper lanes, shorting a resistor and thus making it appear as if two of the buttons were identical. So, my advice here is: ALWAYS use an ohmmeter to check your board for short circuits before powering it up!


Now I hope that the hardware is working correctly and I just have to find the last bugs in the software - which cause the IPM to crash at the moment. There must be some kind of unterminated string buffer lurking in the RAM, making the firmware overwrite everything else in RAM at some point. Once, it even overwrite the EEPROM's contents with rubbish, although I really can't figure out how that could've happened. Well, let's just hope it doesn't happen again...

So far, see you in the near future :)

Samstag, 7. Januar 2012

RC remote control Pong

Hi everyone!

This time, I'm back with a project in which two RC remote controls are used to move the paddles in Pong. Watch me lose it against my brother here ;)
But now how does it work?
Let's start by looking at the RC controls: For each channel a pulse with a width of 0.7 up to 2 milliseconds is issued from the remote control. A pulse shorter than 1.5 ms would turn a servo left, one greater 1.5 would turn it right. You can read about this in some more detail here.
The analogue RC receivers' signal output lines are connected directly to digital inputs (ports 3 and 5) of my Arduino. They run fine with the 5V power from the Arduino, even if it draws its power from an USB port.
On the Arduino, a very simple sketch measures the control pulse lengths via "pulseIn". During the first five seconds, the gathered values are investigated for their minimum and maximum, so you will have to turn the knobs on your RC controls to their farthest extend here. The range of the pulse lengths is then mapped to a single byte for each channel.
The actual Pong game runs on a PC within the Processing IDE. To achieve this, I adapted the "SerialCallResponse" example sketch and added a Pong implementation in Java. There is a class called "ControlValues" which serves as an interface between the game and the Processing sketch. This approach is in no way thread-safe, but since game is timer-based and the Processing sketch is event-based, it seemed the easiest way to connect both using static variables.
The Processing sketch first starts the game and then begins querying the Arduino for new control values. To simply retrieve the values, it sends an 'A', to which the Arduino responds by sending the current values.
By sending a 'B' or 'C', the sketch can make the Arduino play some beeps in addition to sending the values. This should give you the real retro feeling! To hear the beeps, simply connect a speaker to port 7 (via transistor or op-amp). You may notice that sometimes a beep isn't played (ball touches the paddle, but there's no sound). This is due to the threading problems mentioned above.
To play you can download the Arduino sketch and Processing sketch.

Dienstag, 3. Januar 2012

IPM V2 update

Hey everyone! I think it's time to wish all of you a Happy New Year first ;)
Then, I'll show you what I did while I left you alone out there all the time...
The Internet Personal Messenger V2 now features almost the same functionality as the old V1 one. Here's a picture of the current hardware setup (still missing the speaker, though):
I'll post the setup's schematics next time - and I'll also show you the code, but at the moment, there are still some memory leaks I have to fix.
Ah, by the way, the TFT is quite nice and really cheap! It's got an ST7735 controller on it. The library seems to originate from ladyada but the one I got shipped with the TFT was pretty buggy. The software mode was really slow too. If you'd like to get my improved version, please mail!
I'm using the software SPI for the TFT in my sketch as at was impossible to get it running on the same bus the ethernet controller and the TF card are using. The controller and the card use SPI transfer mode 0, the TFT uses mode 3. As mode 3 seems to be just the inverted variant of mode 0, there may be a possibility to use the same bus with all three devices if you'd use an inverter to connect the TFT to the bus. I didn't test this though, as things run fine for me the way they are ;)
That's it for now! Keep up gadgeting!

Freitag, 16. Dezember 2011

IPM product presentation

Hi folks!
For those of you, who don't know what the Internet Personal Messenger Project is all about, my friend The AirBear (proud owner of the IPM V1) created a Flash animation giving some explanations. It also features an icon of the IPM V1 in its makeshift housing - an old cardboard box!
Watch it here!
If you care, you may also explore the BearBros website, made by The Airbear. Bye for now - Mr Pelz

Mittwoch, 7. Dezember 2011

Arduino chiptune synthesizer


Today, I'm back again with source code and a video for you! Enjoy my first chiptune for the Arduino ;)

 
With the help of Draeyoc, I was able to get Linus Akesson's hardware chiptune player onto my Arduino. It is a port Draeyoc got from somewhere on the net, and I used the Linus' simplistic but perfectly usable chiptune tracker to create my own tune. However, the tracker exported an assembly source file, which I had to compile and decompile again to get the correct byte sequence for use in the player sketch.
If you want to create your own tune, then...
  • Use the tracker (Linux) to compose it.
  • Export it ("%" key in the tracker).
  • Run my conversion script in the tracker folder (you'll need gcc and java for it to run!).
  • Open the file "song.lst" and copy its contents to the clipboard.
  • Open the player sketch and replace the byte sequence in "songdata" by the sequence from "song.lst"
  • Update the defines of "MAXTRACK" and "SONGLEN" to the values found in "exported.h" in the tracker directory.
  • Connect a speaker to port 3 and two LEDs to ports 10 and 12 and enjoy your personal disco with synchronized light show.
You'll find the sources for my song in the conversion script archive. I also altered the player code a bit, making the LEDs light up brighter and I added a (glitchy!) rewind at the end of the song.
Have fun!